Natural Light Self Portrait Techniques for Beginners
Natural light plays a starring role in self-portrait photography by casting a soft flattering glow that artificial lights often cannot pull off. When you work with the sun's rays, you bring out authentic skin details and set the mood as brightness shifts throughout the day, making it one of the most effective self portrait techniques for capturing portraits that feel honest and timeless. Unlike flashes or studio setups, natural light dances along with your expression and surroundings, lending your photos a grounded and genuine vibe. Plus, it is a straightforward way for beginners to experiment without dropping a fortune on fancy gear.
Understanding Natural Light and Why It Matters (And Why You Should Care)
Natural light usually comes from either direct sunlight or gentler diffused light and each one has a unique vibe. Direct sunlight hits hard and throws down sharp shadows that add drama. On the flip side, diffused light like what you get on cloudy gray days softens everything and smooths out shadows while giving skin tones a nice even glow.
- The golden hour wraps everything in a warm glow right after sunrise or just before sunset. It makes skin tones look flattering like nature’s own Instagram filter.
- The blue hour brings cooler, diffused light that’s perfect for adding a moody artistic vibe to portraits. Think of it as the quiet hour before the world wakes up or winds down.
- Overcast skies act like a natural softbox by spreading light evenly and softening shadows. This is a lifesaver when you want to avoid harsh contrasts.
- Window light offers soft directional illumination that’s ideal for indoor self-portraits. It gives just the right touch of subtle highlights without going overboard.
- Shaded outdoor spots provide gentle controlled light that’s less intense and helps you nail balanced exposures without breaking a sweat.
Key Equipment and Setup for Capturing Those Perfect Natural Light Self-Portraits
Kicking off with natural light self-portraits doesn’t call for fancy or expensive gear. Just a trusty camera or smartphone paired with something steady like a tripod or flat surface sets you up nicely. Using a remote shutter or timer is a real lifesaver for hands-free shooting. A quick trick I’ve found helpful is to use reflectors or plain white surfaces to soften stubborn shadows.
- Using a DSLR, mirrorless camera or a trusty smartphone that lets you fiddle with manual controls really opens the door to creativity.
- A tripod or any steady surface is a lifesaver to dodge that annoying blur from shaky hands and helps you nail your shot just right.
- Remote shutter releases or built-in timers are perfect helpers for taking self-portraits without feeling like you’re racing against the clock.
- Reflectors or simple white foam boards work wonders by softly bouncing sunlight to tame harsh shadows on your face.
- Clean uncluttered backgrounds like plain walls or natural scenes keep the spotlight on your subject and the beautiful lighting with no distractions.
Getting Comfortable with Exposure and Camera Settings in Natural Light (Because Mother Nature Doesn’t Always Play by the Rules)
To make the most of natural light it helps to get a good grip on ISO, aperture, shutter speed and white balance settings. Playing around with manual or semi-automatic modes lets you find the sweet spot between brightness and background blur while keeping skin tones looking just right and capturing the vibe of the scene.
- Start off with a low ISO setting (100-200) to keep that pesky grain down and make sure your image stays nice and sharp.
- Pick a wide aperture (f/1.8 to f/4) to softly blur the background—this little trick really helps you pop out from the scene.
- Tweak the shutter speed to nail the perfect exposure—faster speeds cut down motion blur, while slower ones let more light sneak in.
- Set the white balance manually or lean on presets to keep skin tones looking natural, no matter how tricky the lighting gets.
- Use exposure compensation for those subtle brightness tweaks, so you don’t have to juggle shutter speed or aperture too much.
Tips for Posing and Composition Using Natural Light
Getting the hang of natural light can feel like a bit of an art form, but with a few handy tips up your sleeve, you will be capturing shots that really shine—literally. Whether you are aiming for those soft, dreamy glows or crisp, vibrant contrasts, understanding how to pose and compose your subjects with natural light makes all the difference. So, let’s dive in and explore some approachable advice that'll have your photos looking effortlessly beautiful in no time.
Natural light shapes your face by casting shadows that highlight depth and character in your portraits. Nailing the right angles to catch that perfect light can truly elevate your self-portraits and give them something extra.
- Face the light source head-on to get a soft, even glow that highlights your facial features naturally and without any fuss.
- Experiment with side lighting during the golden hour because it works like magic for creating cool shadows that add depth and character to your shots.
- Use backlighting to create striking silhouettes and lovely, subtle halos around hair that give a dreamy feel.
- Find a shady spot to avoid harsh contrasts and capture gentle, flattering light that works wonders for any portrait.
- Toss in simple props like hats or scarves as they add texture and charm without stealing the spotlight.

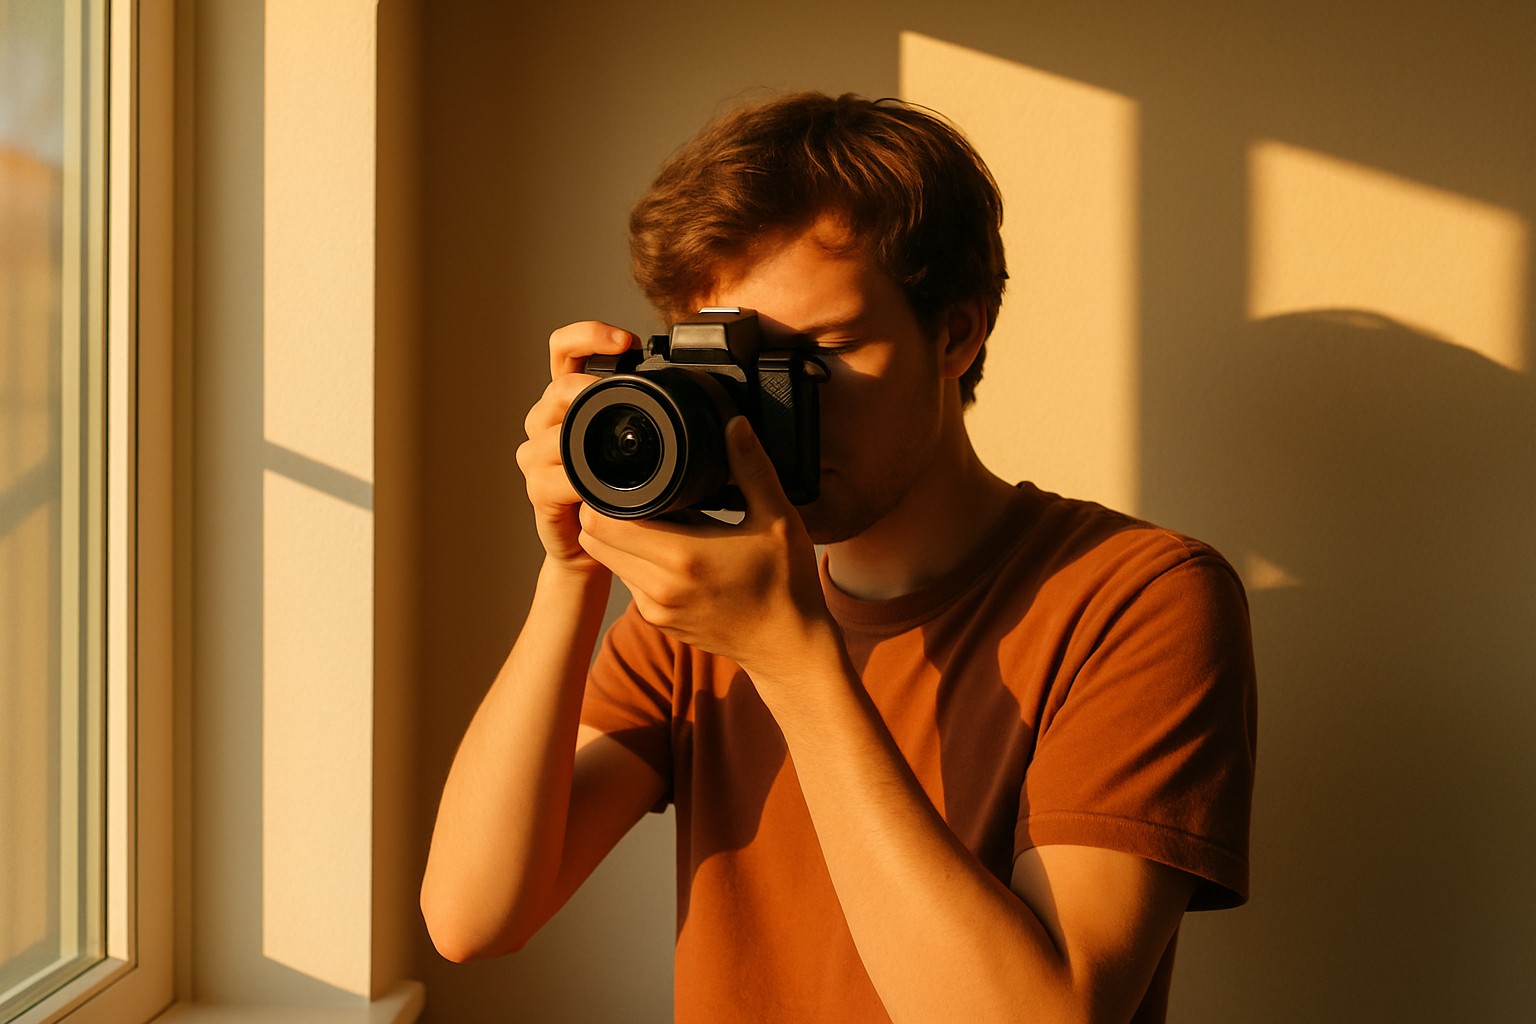
Example of a natural light self-portrait showing effective use of window light and simple posing techniques.
Clever Ways to Make the Most of Natural Light in Your Self-Portraits (Because Who Doesn’t Love a Little Sun-Kissed Glow?)
Grabbing everyday household items can genuinely elevate your natural light portraits in ways that might surprise you. DIY reflectors or diffusers work wonders to tame that sometimes harsh sunlight, while mirrors or colored fabrics sneakily introduce intriguing light effects or gentle color hues that add a little oomph. Architectural features like window sills or doorways naturally frame your subject, lending depth.
- Whip up a simple DIY reflector by wrapping a piece of white foam board or cardboard with aluminum foil. This is an easy trick to bounce some extra light where you need it.
- Soften that harsh midday sun by draping sheer curtains or a light white fabric over your windows. It gives your room a gentle, flattering glow.
- Strategically place small mirrors to catch sunlight and sprinkle gentle highlights on your face. Trust me, it adds a subtle sparkle that is hard to beat.
- Introduce a splash of personality by using colored fabrics or scarves to cast soft tones and moods through the reflected light. This makes your setup feel a bit more alive.
- Don’t overlook architectural details like window sills and doorways because they’re perfect for naturally framing your shots and layering in some unexpected depth.
Tips for Editing to Truly Make Natural Light Self-Portraits Shine
When editing your self-portraits the real trick is to boost the natural lighting just enough without stripping away that authentic vibe. Beginner-friendly programs come loaded with handy tools that let you gently play with exposure and smooth out shadows and highlights or tweak colors until they sing.
- Start adjusting exposure and contrast with a gentle touch. Aim to preserve the beautiful natural light balance without going overboard.
- Bring out hidden details in the shadows to add nice depth and soften highlights to avoid harsh blown-out spots.
- Take a careful stab at fine-tuning white balance. This fixes subtle color casts and makes sure skin tones feel genuine and lifelike.
- Apply gentle skin retouching to smooth blemishes but avoid going too far so the texture still feels authentic and natural like real skin.
- Use presets or filters sparingly. Think of them as seasoning not the main course so your lighting choices can take center stage without distractions.
The Classic Slip-Ups People Often Stumble Over When Snapping Natural Light Self-Portraits
Natural light can work wonders, though beginners often find themselves wrestling with harsh midday sun that throws up glaring highlights and shadows that are anything but flattering. It’s easy to overlook background clutter or get distracted by the wrong details, which can really throw your composition out of whack. Going overboard with editing can sometimes rob your photo of that genuine, natural charm.
- Try to avoid shooting in the harsh midday sun because it creates strong, unflattering shadows and bright spots that are too glaring.
- Watch where shadows fall on your face so you don’t end up with strange dark patches that distract for the wrong reasons.
- Choose a clean, simple background that isn’t too busy so everyone’s attention stays on you.
- Make sure the camera focuses clearly on your eyes or other important facial features, as this really makes a difference.
- Don’t overdo heavy editing that smooths your skin until it looks fake or changes the natural light so much that it feels unnatural.
Quick Checklist for Beginners: Tried-and-True Self Portrait Techniques for Naturally Beautiful Photos
| Technique | Description | Tip for Immediate Implementation | Common Mistake to Avoid |
|---|---|---|---|
| Use Golden Hour Lighting | Capture that warm, flattering glow around sunrise or sunset when everything seems to shine just right | Aim to schedule your shoots just after sunrise or right before sunset, when the light gives you that magic touch | Shooting smack in the middle of the day when the light is harsh and anything but forgiving |
| Employ Wide Aperture | Create a beautifully blurred background that draws all eyes to your face | Dial your aperture between f/1.8 and f/4 for that perfect balance | Going for narrow apertures that flatten out your image and kill the vibe |
| Utilize DIY Reflectors | Bounce light softly to fill in shadows without hauling extra gear around | Give white foam boards or a sheet of aluminum foil a whirl as budget-friendly reflectors | Forgetting to angle the reflector correctly so the light ends up all wrong |
| Practice Manual Exposure | Take charge of brightness and skin tones by dialing in your settings yourself | Start with a low ISO and play around with shutter speed until it feels just right | Relying solely on auto mode, which can leave you with unpleasant overexposed shots |
| Keep Background Simple | Make sure your face stays the star and let natural light do its thing | Opt for plain or natural backgrounds that don’t fight for attention | Allowing cluttered or distracting backgrounds to steal the spotlight |
Regular practice truly is the secret sauce to mastering self-portrait techniques using natural light. Give yourself the freedom to experiment at different times of day, from various angles and with a quirky mix of props. Finding your own style is like a fun treasure hunt.